 If you’re new to the ’12 Days’, you may visit the previous days by clicking on the day you like:
And you’re in for a treat today. You’ll need to carve out some time to visit Cheryl’s blog. I think I clicked around her blog for an hour when I first found it. She also has a shop full of beautiful handmades! Thanks for sharing your craftiness with us Cheryl~
Hi friends of Edie!
I’m Cheryl from a pretty cool life and I’m so exited to be here!
First, a little about me: Life’s good. I aspire to be no more than I am right now; the stay at home mom to two little boys, ages 3 and 1. I love the ordinary days I spend with them, and desperately try to enjoy each one until I find a way to freeze time. We spend our days playing, building, chasing, snacking, watching too much tv and trying be creative. Sewing and crafting are my favorite things, and I spend as much time as I can working on projects. I share many of them, along with tutorials. You can check them out here. Vintage is my other weak spot and I love collecting old linens. My loves of handmade and vintage meet in my etsy shop, j u s t p r e t t y., where I list a variety of items.
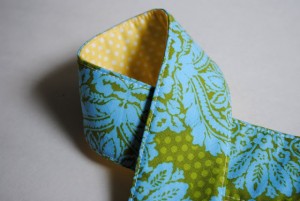
Now, without further ado, what I’ll be sharing today: a camera strap tutorial. You know you’ve seen them everywhere in blogland and etsy. Here’s a chance to make one of your own:
I’ll admit I’m just as excited to have a pretty camera strap as I am to have a new camera. This is an easy project, so you can make a bunch and switch them out when you feel like it!
This is what I did for my standard Nikon strap. Double check your own strap to see if it’s the same size before you start. (And if you have a point and shoot, here’s my tute on how to make a wristlet strap for it.)
You’ll need:
2 strips of fabric, each 21″ x 2.5″ long
1 strip of fusible fleece/batting, 20″ x 2.5″
Iron the short ends of each strip down a quarter inch.
Sew two parallel lines to hem the ends (one will catch your fabric, one’s just to make it look more finished).
Iron the fusible fleece to the wrong side of the strip of fabric you want facing inside. It should be slightly shorter than the fabric, so center it.
Line up your strips of fabric, right sides together, and pin.
Sew. I serged the seams, too, but it’s not necessary.
Turn your fabric tube right side out.
Topstitch along each edge and you’re all set!
Happy {handmade} holidays and thanks again to Edie for having me!

Cheryl
xoxo


