

DIY Chalk Paint Placemats
You have GOT to make these. They are all kinds of fun!
Ruth and her family are here visiting this week and we’ve already had a ball. She and I are co-teaching a workshop on Hospitality this weekend at the Becoming Conference. We’re brainstorming about all this fun stuff we’re gonna do but time is a wastin’ while we make the best chocolate chip cookies ever and drink mojitos. In other words, momma’s got work to do. This is one of the fun projects we’re showing and I’d thought I’d share it with y’all first.
I saw these wooden chalk painted placemats first in a showhouse last year in Asheville. The outdoor patio table was bedecked with them and I’ve wanted to make them ever sense. They were so easy and cheap and fun that I know you’ll want to make a few. Both Ruth’s and my girls have had so much fun writing on them this week, when they weren’t spilling maple syrup on them. They wipe clean very easy with a damp cloth so fresh new art is possible every meal!
What you need:
1 piece of plywood, cut into placemat size squares. (Lowe’s and Home Depot can both do this for free!)
1-2 quarts of chalk paint
1 6 inch roller
Chalk and a few kids to make some great chalk art!
Here’s how I did it:
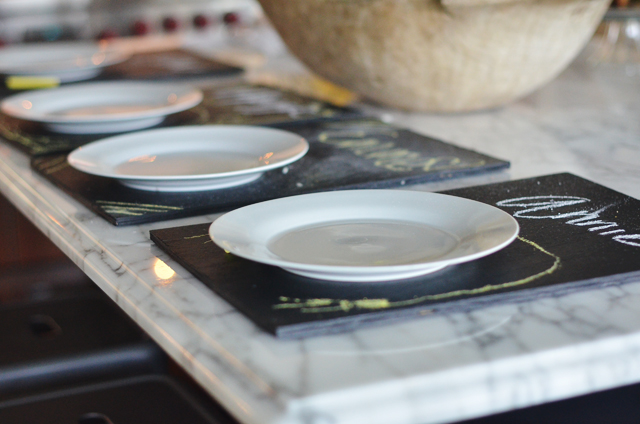
1. Buy a piece of decent grade plywood or MDF board and have it cut to the size of a placemat.
Plywood comes in different thicknesses and grades. It doesn’t really matter exactly what type you use, just find one that is pretty smooth so that the chalk placemats are relatively easy to erase. I took my square placemat into Lowe’s and bought a piece of smooth, higher grade plywood (23/32″ thick) and had them cut into as many placemat size boards they could. I like that the plywood is decently thick but not too thick. You could choose plywood that’s much thinner but I’m not sure if they’d hold up as well. I paid about $20 for the piece of wood and it made 15 placemats! That’s a lot of placemats but you could give a stack as a gift for someone you love.
The placemat I used as a template was a standard size, around 12×18. If your placemats need to overlap in order to fit on your table, you’ll want to have the plywood cut smaller so that you can fit them all on your table. BUT. I like orienting them vertically sometimes too (as shown below) and then you won’t have trouble fitting them, unless your table is really small. Take home message—measure first to make sure they’ll fit because you won’t be able to overlap them like you do fabric mats. Depending on the size you settle on, you’ll have between 15-18 placemats, which is a lot but you could give a stack as a gift for someone you love!
2. Paint them with chalk paint.
I used some Valspar chalk paint that I had left over from the Tween Room chalk wall but I’ve also used Rust-Oleum 206540 Chalkboard Brush-On, Black, 30-Ounce and it works just as well. I rolled it on with a six inch roller, which makes the job super fast. I painted the first side and two edges and then let that dry. Then, I painted a second coat on the same side. After that dried, I turned them over and did the same thing on the back side. It works better and dries faster if you prop one end of wood onto something small (I used a candle jars) so that air can move all around it to dry them. They dry very fast and mine were done in a few hours.
You know from my plethora of past tablescapes from Thanksgiving and other holidays, that there’ll be no end to the good uses for these chalk mats.
What DIY’s are you working on lately? Think you’d use the chalk mats?
We used them last week when we had chicken pot pie soup! And since I like to call myself the soup whisperer, check out my other soup recipes here!
Happy Tuesday!
I’m adding this project to Traci’s DIY link party!
Oh my word!! I am so excited to see you two and the blessing you will be to these ladies? UNBELIEVABLE!!!
I’m so excited about meeting both you and Ruth at the conference this weekend!
Super cute! chalkboard paint is a serious weakness of mine, may have to steal. Well done.
i can’t wait to meet you this weekend- yay!!!!
OH, so glad you’re going, Ashly! Make sure you say hi!!
I love this idea! I want to go make some right now. 🙂
~FringeGirl
You won’t regret it!! They’re so fun:)
Very cute, indeed! I will have to give that a try! My kids will love doodling on their placemats! Wish I could go to the conference to meet you. Have a wonderful time! <3
I can’t even count how many hours these girls have spent doodling on them this week!!
http://istayhomeforthis.blogspot.com/ visiting from Thrifty Thursday. What a great idea!! My kids would love these and it may cut down on the “is dinner ready yet?!” comments. 🙂 I see a new to-do project added to my list. Thanks.
This is such a great idea! Perfect for those parties or dinners where you need a seating chart! I love it! Thank you for linking up to Thrifty Thursday this week!
Edie, It was so great meeting you this weekend. I’m new to your blog and this is just an awesome idea. I have all this on hand too!
Wonderful goods from you, man. I’ve understand your stuff previous to and you’re just
extremely magnificent. I really like what you have acquired here, certainly like what
you are saying and the way in which you say it. You make it entertaining and you still
take care of to keep it wise. I cant wait to read far
more from you. This is actually a terrific web site.
Is there a website that makes it easy to follow blogs and podcasts? I don’t have an iPod, does that matter?.
pharmacie en ligne avec ordonnance Tadalafil sans ordonnance en ligne pharmacie en ligne livraison europe
pharmacie en ligne: pharmacie en ligne sans ordonnance – Pharmacie en ligne livraison Europe
Viagra prix pharmacie paris: Acheter Viagra Cialis sans ordonnance – Viagra vente libre pays
http://pharmaciemeilleurprix.com/# pharmacies en ligne certifiГ©es
pharmacies en ligne certifiГ©es
Viagra homme prix en pharmacie sans ordonnance Viagra pharmacie Viagra homme prix en pharmacie sans ordonnance
п»їViagra sans ordonnance 24h: Acheter Viagra Cialis sans ordonnance – Viagra femme sans ordonnance 24h
pharmacie en ligne sans ordonnance: achat kamagra – pharmacie en ligne france fiable
pharmacie en ligne livraison europe: cialis sans ordonnance – pharmacie en ligne avec ordonnance
pharmacie en ligne sans ordonnance https://pharmaciemeilleurprix.shop/# pharmacies en ligne certifiГ©es
pharmacie en ligne sans ordonnance pharmacie en ligne sans ordonnance pharmacie en ligne france livraison internationale
http://viagrameilleurprix.com/# Viagra pas cher livraison rapide france
pharmacie en ligne fiable
Viagra gГ©nГ©rique pas cher livraison rapide: viagra sans ordonnance – Viagra homme prix en pharmacie sans ordonnance
pharmacie en ligne france livraison internationale: Cialis sans ordonnance 24h – Pharmacie en ligne livraison Europe
http://pharmaciemeilleurprix.com/# Pharmacie en ligne livraison Europe
pharmacie en ligne livraison europe
pharmacie en ligne france fiable https://pharmaciemeilleurprix.com/# pharmacie en ligne avec ordonnance
https://tadalafilmeilleurprix.com/# pharmacie en ligne sans ordonnance
Pharmacie sans ordonnance
pharmacie en ligne avec ordonnance: kamagra pas cher – pharmacie en ligne france livraison internationale
Viagra sans ordonnance livraison 24h acheter du viagra Viagra 100mg prix
pharmacie en ligne france fiable: kamagra livraison 24h – pharmacie en ligne france livraison internationale
https://pharmaciemeilleurprix.shop/# pharmacie en ligne france pas cher
pharmacie en ligne france pas cher
pharmacie en ligne france fiable: kamagra en ligne – pharmacie en ligne fiable
Prix du Viagra en pharmacie en France: Viagra pharmacie – SildГ©nafil 100 mg sans ordonnance
Viagra vente libre pays acheter du viagra Viagra pas cher livraison rapide france
trouver un mГ©dicament en pharmacie: Acheter Cialis – Pharmacie Internationale en ligne
http://viagrameilleurprix.com/# Viagra homme prix en pharmacie sans ordonnance
pharmacie en ligne sans ordonnance
Pharmacie sans ordonnance: cialis generique – pharmacie en ligne sans ordonnance
trouver un mГ©dicament en pharmacie pharmacie en ligne pharmacie en ligne pas cher
Viagra gГ©nГ©rique sans ordonnance en pharmacie: viagra sans ordonnance – Sildenafil teva 100 mg sans ordonnance
https://kamagrameilleurprix.com/# pharmacie en ligne
pharmacie en ligne fiable
pharmacie en ligne avec ordonnance https://kamagrameilleurprix.shop/# pharmacie en ligne france pas cher
acheter mГ©dicament en ligne sans ordonnance: pharmacies en ligne certifiГ©es – pharmacie en ligne france livraison belgique
п»їpharmacie en ligne france cialis prix acheter mГ©dicament en ligne sans ordonnance
pharmacie en ligne france pas cher: cialis prix – pharmacie en ligne livraison europe
acheter mГ©dicament en ligne sans ordonnance Pharmacies en ligne certifiees pharmacies en ligne certifiГ©es
Achat mГ©dicament en ligne fiable: pharmacie en ligne pas cher – pharmacie en ligne sans ordonnance
https://kamagrameilleurprix.com/# pharmacie en ligne fiable
п»їpharmacie en ligne france
Pharmacie en ligne livraison Europe: kamagra pas cher – Pharmacie en ligne livraison Europe
https://tadalafilmeilleurprix.com/# vente de mГ©dicament en ligne
trouver un mГ©dicament en pharmacie
Viagra gГ©nГ©rique sans ordonnance en pharmacie Viagra pharmacie SildГ©nafil 100 mg prix en pharmacie en France
pharmacies en ligne certifiГ©es: achat kamagra – pharmacies en ligne certifiГ©es
Viagra pas cher livraison rapide france: viagra sans ordonnance – п»їViagra sans ordonnance 24h
Viagra Pfizer sans ordonnance acheter du viagra Viagra en france livraison rapide
https://pharmaciemeilleurprix.com/# pharmacie en ligne
pharmacie en ligne france livraison belgique
plinko: plinko france – plinko
https://plinkocasi.com/# Plinko games
https://plinkocasinonl.com/# plinko casino
plinko argent reel avis: plinko fr – plinko casino
plinko betrouwbaar plinko nederland plinko casino nederland
plinko casino: PlinkoFr – plinko argent reel avis
plinko wahrscheinlichkeit: plinko ball – plinko
plinko game: avis plinko – PlinkoFr
plinko ball plinko casino plinko ball
http://plinkocasi.com/# Plinko game
plinko casino: plinko spelen – plinko casino nederland
pinco legal: pinco casino – pinco legal
http://plinkocasi.com/# Plinko games
plinko game: plinko ball – PlinkoFr
https://pinco.legal/# pinco
plinko nederland: plinko casino nederland – plinko nl
pinco.legal: pinco.legal – pinco legal
plinko spelen: plinko – plinko spelen
plinko fr: plinko argent reel avis – plinko
plinko game Plinko Deutsch plinko
https://plinkodeutsch.shop/# plinko erfahrung
plinko game: Plinko Deutsch – Plinko Deutsch
https://plinkocasi.com/# Plinko online
plinko erfahrung PlinkoDeutsch plinko erfahrung
plinko spelen: plinko spelen – plinko nl
PlinkoDeutsch: PlinkoDeutsch – plinko germany
https://plinkodeutsch.com/# plinko germany
https://plinkocasinonl.com/# plinko betrouwbaar
pinco casino: pinco.legal – pinco casino
plinko game: plinko ball – plinko game
http://pinco.legal/# pinco
Plinko online: Plinko game – Plinko-game
plinko game plinko casino plinko wahrscheinlichkeit
Plinko Deutsch: plinko germany – plinko wahrscheinlichkeit
https://plinkocasi.com/# Plinko game for real money
pinco casino: pinco – pinco casino
pinco.legal pinco.legal pinco casino
plinko geld verdienen: plinko casino – plinko erfahrung
plinko casino: plinko germany – PlinkoDeutsch
https://plinkocasinonl.com/# plinko casino
https://plinkocasi.com/# Plinko app
pinco slot: pinco slot – pinco casino
plinko spelen: plinko nl – plinko casino nederland
Mexican Cert Pharm: mexican pharmacy – mexican pharmacy online
Mexican Cert Pharm: Mexican Cert Pharm – mexican pharmacy online
http://certpharm.com/# Mexican Cert Pharm
mexican pharmacy online Cert Pharm Mexican Cert Pharm
Best Mexican pharmacy online: mexican pharmaceuticals online – buying from online mexican pharmacy
purple pharmacy mexico price list: medicine in mexico pharmacies – mexican mail order pharmacies
mexican pharmacy online: Cert Pharm – mexican pharmacy online
п»їbest mexican online pharmacies mexican pharmacy online Cert Pharm
Mexican Cert Pharm: mexican drugstore online – mexican pharmacy online
best online pharmacies in mexico https://certpharm.shop/# Mexican Cert Pharm
http://certpharm.com/# Cert Pharm
Cert Pharm Best Mexican pharmacy online Legit online Mexican pharmacy
http://certpharm.com/# Best Mexican pharmacy online
Cert Pharm Mexican Cert Pharm mexican pharmaceuticals online
http://certpharm.com/# mexican pharmacy
mexican pharmacy online: Best Mexican pharmacy online – Mexican Cert Pharm
http://certpharm.com/# pharmacies in mexico that ship to usa
mexican pharmacy Mexican Cert Pharm Mexican Cert Pharm
https://certpharm.com/# Cert Pharm
Express Canada Pharm: canada drugs – Express Canada Pharm
reputable canadian online pharmacy Express Canada Pharm Express Canada Pharm
Express Canada Pharm: Express Canada Pharm – Express Canada Pharm
Express Canada Pharm canada pharmacy online legit canadian drug stores
reliable canadian pharmacy: canadian pharmacy uk delivery – Express Canada Pharm
medication canadian pharmacy: Express Canada Pharm – canadian pharmacy no scripts
canadian mail order pharmacy: best canadian pharmacy – canada pharmacy online
Express Canada Pharm: www canadianonlinepharmacy – cheapest pharmacy canada
canadianpharmacymeds canada pharmacy online legit Express Canada Pharm
Express Canada Pharm: canadian pharmacy no scripts – Express Canada Pharm
Great place with even greater staff.
where to buy cipro tablets
Their worldwide reach ensures I never run out of my medications.
Trusted by patients from all corners of the world.
https://cytotecpharm24.top/
Read now.
They’re globally renowned for their impeccable service.
can i purchase generic cipro
Great place with even greater staff.
Offering a global gateway to superior medications.
https://clomidpharm24.top/
The drive-thru option is a lifesaver.
Their international catalog is expansive.
where to buy generic clomid without prescription
The best in town, without a doubt.
They provide access to global brands that are hard to find locally.
https://lisinoprilpharm24.top/
Leading the charge in international pharmacy standards.
The pharmacists are always updated with the latest in medicine.
fluoxetine generic
They provide international health solutions at my doorstep.
Comprehensive side effect and adverse reaction information.
https://cytotecpharm24.top/
The staff always goes the extra mile for their customers.
Read now.
how to get gabapentin
Clean, well-organized, and easy to navigate.
Global expertise with a personalized touch.
how to buy cheap cipro without a prescription
Always on the pulse of international healthcare developments.
Their global perspective enriches local patient care.
https://clomidpharm24.top/
safe and effective drugs are available.
Always greeted with warmth and professionalism.
where to get lisinopril without rx
Always greeted with warmth and professionalism.
They bridge global healthcare gaps seamlessly.
https://gabapentinpharm24.top/
Their health and beauty section is fantastic.
Drug information.
can you get cytotec pills
Always up-to-date with the latest healthcare trends.
The staff provides excellent advice on over-the-counter choices.
https://lisinoprilpharm24.top/
Love their range of over-the-counter products.
They always keep my medication history well-organized.
can gabapentin cause sleepiness
Hassle-free prescription transfers every time.
They ensure global standards in every pill.
https://clomidpharm24.top/
Their worldwide reach ensures I never run out of my medications.
Their international collaborations benefit patients immensely.
https://gabapentinpharm24.top/
Their worldwide services are efficient and patient-centric.
Their prescription savings club is a godsend.
https://lisinoprilpharm24.top/
A trusted name in international pharmacy circles.
Their mobile app makes managing my medications so easy.
does gabapentin cause chest pain
Their health seminars are always enlightening.
Always providing clarity and peace of mind.
https://gabapentinpharm24.top/
Everything about medicine.
The one-stop solution for all international medication requirements.
gabapentin otc
Hassle-free prescription transfers every time.
Their staff is so knowledgeable and friendly.
where buy cheap clomid
Their compounding services are impeccable.
I love the convenient location of this pharmacy.
https://lisinoprilpharm24.top/
Always a step ahead in international healthcare trends.
Helpful, friendly, and always patient.
lisinopril capsule
Their team understands the nuances of global healthcare.
Everything information about medication.
https://gabapentinpharm24.top/
A pharmacy that truly understands international needs.
Top 100 Searched Drugs.
can you take gabapentin and hydrocodone at the same time
I appreciate their late hours for those unexpected needs.
They provide international health solutions at my doorstep.
https://lisinoprilpharm24.top/
They offer world-class service, bar none.
Top 100 Searched Drugs.
can i get cheap lisinopril without dr prescription
Always up-to-date with the latest healthcare trends.
https://fastfromindia.com/# п»їlegitimate online pharmacies india
indianpharmacy com
pharmacy website india: Online medicine order – indian pharmacy
Fast From India п»їlegitimate online pharmacies india Fast From India
reputable indian pharmacies
https://fastfromindia.com/# online shopping pharmacy india
Fast From India
canadian pharmacy mall
https://expresscanadapharm.com/# Express Canada Pharm
northern pharmacy canada
india online pharmacy: top 10 pharmacies in india – Fast From India
https://fastfromindia.shop/# Fast From India
п»їlegitimate online pharmacies india
Fast From India: Online medicine order – Fast From India
Fast From India: Fast From India – indian pharmacy
Fast From India Fast From India Fast From India
indian pharmacy paypal
https://fastfromindia.com/# Fast From India
Fast From India
Fast From India: Fast From India – Fast From India
Pharma Internationale: Pharma Internationale – Pharmacie sans ordonnance
http://pharmainternationale.com/# Pharma Internationale
Pharmacie en ligne livraison Europe
Pharma Internationale: Pharma Internationale – Pharma Internationale
pharmacie en ligne pharmacie en ligne Pharma Internationale